
이 페이지에서는 ST911 스마트 대시보드(4.6인치 대시보드), ST911max(6.2인치 대시보드) 설치 팁을 제공할 예정입니다. 이 팁들은 설치를 진행하고 최신 소프트웨어로 지속적으로 업그레이드하는 데 큰 도움이 될 것입니다. 고객님께서는 이 페이지를 PC나 휴대폰에 저장해 두시면 편리합니다.
테슬라에서 소프트웨어를 업그레이드하면, 저희도 이에 맞는 관련 소프트웨어를 출시하겠습니다.
ST911 & ST911max의 차이점
ST911은 4.6인치 스크린으로, 터치스크린이 아니며 카플레이 버전은 없습니다
ST911max는 6.2인치 스크린입니다. 캬플레이 미지원 버전(비터치)과 카플레이 지원 버전(터치스크린) 두 가지 타입이 있습니다.
------------------------------------------------------------------------------------------------------------
소프트웨어 업그레이드 팁. ST911 및 ST911max 비-카플레이 버전의 경우, 소프트웨어 업그레이드를 위해 TF 카드 또는 USB 드라이브를 준비한 뒤, 소프트웨어를 TF 카드(또는 USB)에 복사하고 타입 포트에 삽입해 업그레이드를 진행해야 합니다. 반면 6.2 카플레이 스크린 버전은 오른쪽에서 왼쪽으로 스와이프해 설정 메뉴로 들어간 후, 터치로 업그레이드할 수 있습니다.
------------------------------------------------------------------------------------------------------------
설치 팁 – 4.6인치와 6.2인치 제품은 설치 방법이 동일합니다.
----------------------------------------------------------------------------------------------------------
Part I 설치
설치 전 주의사항
1. 제품 케이스에 주의해 주세요. 제품 케이스는 UV 코팅 마감으로 되어 있으며, 이 마감은 단단한 물체에 의해 쉽게 손상될 수 있습니다.
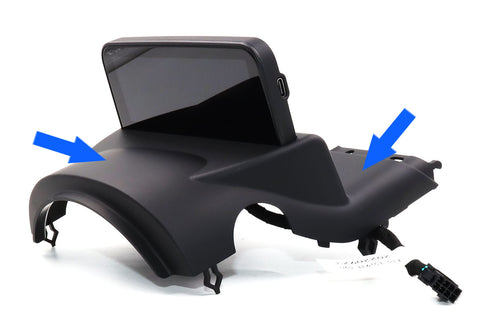
2. 클립 부분에 주의해 주세요. 클립이 정확히 맞물리지 않으면 쉽게 파손될 수 있으니, 차량에 장착하실 때 꼭 주의해 주세요
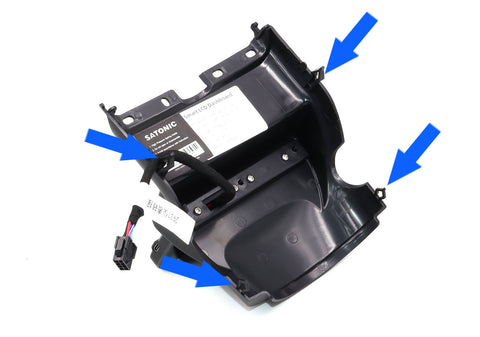
"CAN"의 의미
(Controller Area Network, CAN) , ST911에서 "CAN"이라고 표기된 부분은 데이터 전송을 의미합니다. 예를 들어 CAN 커넥터처럼, ST911 CAN 커넥터를 차량에 연결하면 속도, 배터리, 도어, 안전벨트 등 차량 정보를 읽어올 수 있습니다...
---------------------------------------------------------------------------------------------------------
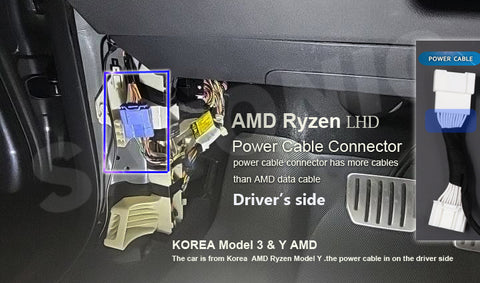
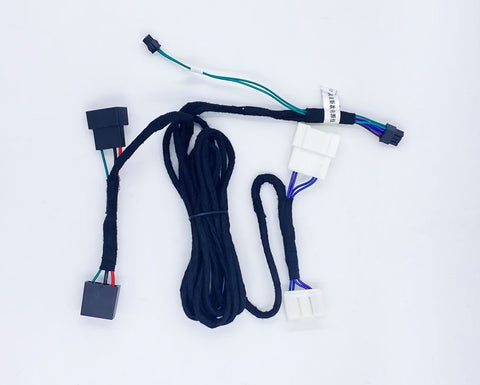
1. 케이블 연결
Ryzen AMD와 Intel Atom 간에는 케이블 연결 방식이 다릅니다. 고객님께서는 이 점에 특히 유의해 주셔야 합니다.
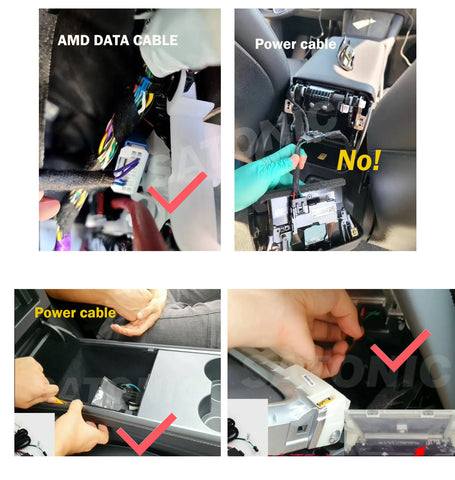
AMD 케이블 설치:
1세대 AMD 케이블 은 두 곳에 연결해야 합니다. 하나는 조수석 측, 다른 하나는 운전석 측 커넥터입니다.
Notice:
ST911 AMD 데이터 케이블의 경우, 한쪽 커넥터는 차량 데이터 커넥터에 연결하고, 반대쪽은 연결하지 않아도 됩니다(다른 제품, 예를 들어 추가 장치 설치용으로 남겨둔 포트입니다).
케이블이 잘못 연결되면 ST911에 전원이 공급되지 않습니다

다음 안내는 LHD(좌핸들 차량) 기준입니다. RHD(우핸들 차량)의 경우, 커넥터 위치가 반대인 차량이 있으니 반드시 커넥터를 확인해 주세요. 전원 커넥터 쪽 케이블 수가 AMD 데이터 케이블 커넥터보다 더 많다는 점으로 구분할 수 있습니다.
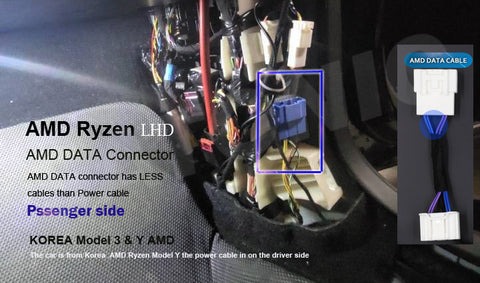
2세대 AMD 케이블 — SATONIC은 2023년 1월 15일부터 케이블을 업그레이드했습니다. 한국 재고 일부 제품에는 1세대 AMD 케이블이 포함되어 있을 수 있습니다. 신형 2세대 AMD 케이블은 전원 케이블을 무선 충전 포트에 연결하는 방식으로, 대시보드를 다시 분해할 필요 없이 센터 콘솔만 열어 무선 충전 커넥터에 전원 케이블을 연결하면 됩니다. 데이터 커넥터는 AMD 데이터 포트에 연결해 주세요.


QR 코드 스캔
설치 영상 확인
인텔 케이블 설치:
인텔 Atom 버전 설치의 경우, 운전석 쪽(일부 차량은 조수석 쪽)에 있는 데이터 케이블만 연결하면 됩니다.

2. 설치 영상 참고
-----------------------------------------------------------------------------------------------------------
Part II 설정
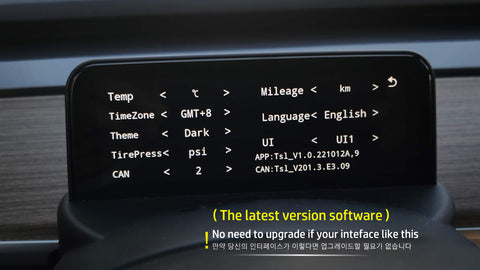
3. ST911/ST911max 설정 방법
설정 모드 진입 방법:
ST911 & ST911max(카플레이 미지원 버전)의 경우, 스티어링 휠 오른쪽 롤 버튼을 오른쪽으로 3초간 길게 누르면 설정 메뉴로 진입합니다. ST911max(카플레이 버전)의 경우, 한 손가락으로 화면을 오른쪽에서 왼쪽으로 쓸어넘기면 설정으로 진입합니다.
설정 모드 종료 방법:
스티어링 휠의 왼쪽 롤 버튼을 밀어 설정을 완료합니다.
CAN 옵션의 공장 초기 설정값은 "1"입니다. ST911에서 화면이 표시되지 않거나 잘못된 정보가 표시될 경우, 설정 메뉴로 들어가 CAN 옵션을 "2"로 변경해 주세요. (테슬라가 2022.28.2 버전부터 소프트웨어 설계를 변경하면서 CAN 데이터 전송 방식이 달라졌기 때문입니다.)

Part III 소프트웨어
4. 소프트웨어
2024.6.14 소프트웨어 업그레이드are, Download & upgrade from :
https://drive.google.com/drive/folders/1gskT7-dYb3zE4Z6Wj6Chq5G1su8snt93?usp=sharing
| 소프트웨어 업그레이드 데모(시간) | Description(설명) |
| 2024.6.14 |
테슬라 소프트웨어 2024.20.1 업그레이드로 인한 데이터 전송 문제를 해결하기 위해(해당 소프트웨어는 ST911/4.6인치, ST911max/6.2인치 대시보드 스크린 전용입니다) 공지: 이 소프트웨어를 다른 대시보드 스크린 업그레이드에 사용할 경우, 화면이 손상될 수 있습니다. |
|
can_app.bin |
https://drive.google.com/drive/folders/1gskT7-dYb3zE4Z6Wj6Chq5G1su8snt93?usp=sharing |
소프트웨어 업그레이드 절차(ST911 & ST911max 비(非) 카플레이 버전 기준):
1) TF 카드(8/16G)를 준비한 뒤, FAT32 형식으로 포맷합니다.
2) "can_app.bin" 소프트웨어를 TF 카드에 복사합니다.
3) ST911/ST911max(카플레이 미지원 버전)의 타입 C 포트에 카드 리더기를 삽입한 뒤, 테슬라 메인 스크린 전원을 껐다가 다시 켜 주세요.
4) 그러면 ST911/ST911max가 자동으로 업그레이드를 시작하며, 업그레이드 진행 바가 표시됩니다. 업그레이드가 완료되면 대시보드가 자동으로 재부팅됩니다.
주의: ST911이 업그레이드되는 동안에는 발을 움직이거나 TF 카드를 제거하거나 전원을 끄지 마세요...
5) TF 카드(U 드라이브)를 분리합니다
- 하이빔 표시 기능 업그레이드
- CAN 옵션 추가: Tesla 소프트웨어가 2022.28.2 이상으로 업데이트된 이후 ST911이 차량 데이터를 읽지 못하는 문제를 해결합니다.
소프트웨어 업그레이드 절차(ST911max 카플레이 버전):
1) TF 카드(8/16G)를 준비한 뒤, FAT32 형식으로 포맷합니다.
2) "can_app.bin" 소프트웨어를 TF 카드에 복사합니다.
3) ST911max 카플레이 버전의 Type-C 포트에 카드 리더기를 삽입한 뒤, 화면을 오른쪽에서 왼쪽으로 쓸어넘겨 설정 메뉴로 진입합니다. 그다음 "Set" > "Version" > "CAN" > "Upgrade"를 선택합니다.
업그레이드 영상: Check It Now
온라인 제품 지원: support@satonic-autoparts.com
고객 케어 불만 및 제안: info@satonic-autoparts.com


Bonjour la mise à jour fonctionne parfaitement
je suis rentré dans le véhicule
j’ai insérer la clé usb avec l’adaptateur USB C dans l’écran ca c’est lancer instantanément sans avoir eu a éteindre la voiture
Clé USB mis en FAT32 et la fichier directement dedans sans mettre de dossier dans la clé
Updated. The unit finally rebooted. I turned off my Bluetooth in my phone and locked the car for a night. The unit did boot up again in next morning. I believe the inability of cutting the power contributes this problem.
Thanks for the help.
I try HIrotsugu method and it can update. However, it never restart afterwards. I sit and wait for 20 minutes and still not restart. I don’t know what to do now.
What about software download for ST911PLUS?
I follow the instructions to update ST911 and it never performed the firmware update process. Try multiple TF 8 Gb, I have zero success. Format TF card in FAT32 and put can_app.bin at root. Turn off the Tesla screen and restart it by pressing the brake. The ST911 just stay on, ST911 is not restarting or updating. One thing diffeent from the instructions is my ST911 has a tf slot instead of Type-C
Unbelievable.